General
- 3D echo = extra value and information (not replacing 2D)
- 3D echo ≠ method to repair bad 2D images
- Initially: offline analysis → long breath holding, time consuming, results often too late
- matrix array transducers: all elements transmit and receive electronically, live 3D real time possible, no offline reconstruction necessary (no postprocessing)
Live 3D
- takes a pyramid of data
- real time (“what you see is what you get”)
- no stitch artifacts
- low frame rate
- always hit ‘acquire' button
- ability to rotate and cut in any plane → development of novel views (e.g. from atrial or ventricular side; anatomical view, surgeon's view, …)
3D zoom
- takes a smaller, magnified pyramidal dataset at high resolution
- to focus on a specific area of interest
- no stitch artifacts
- higher frame rate
- not ECG gated
- possibility to add colour but lowers frame rate
- orientation is important (include some external landmarks)
3D full volume
- acquires pieces of segments over successive cardiac cycles
- multibeat acquisition: 2 – 4 – 6 cardiac cycles, stitched together
- ECG must be attached!
- artifacts when movement of patient (suspend breathing)
- ↑cycles → ↑frame rate, but also ↑acquisition time and ↑risk stitch artifacts
- ‘one beat acquisition' possible but not as good, ↓spatial resolution
- possibility to add colour (e.g. evaluate AV regurgitation), but difficult: long acquisition time, ↑stitch artifacts
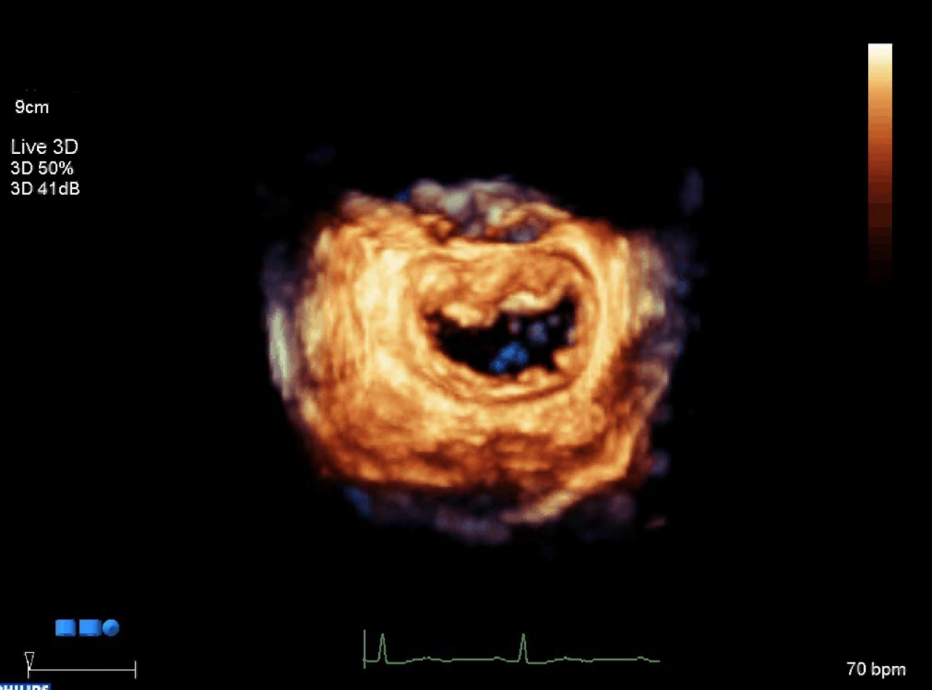
Example: imaging mitral valve with 3D zoom TOE (EPIQ, Philips)
- obtain a ME four chamber view (0-20°)

- optimise gain settings (TGC/LGC) to avoid any overly bright or dark areas
- touch 3D zoom button
- 2 reference images will appear on the monitor: standard scanning plane (four chamber view) on the left and the orthogonal/elevation plane (two chamber view) on the right
- position the 3D zoom box over the area of interest in the reference image on the left hand side of the monitor
- use the tracking ball to move the position of the box and the surrounding buttons to adjust the size of the box
- ensure all the anatomy of interest is included: i.e. the mitral valve and annulus but also some usefull landmarks to assist you in orientation later on (e.g. part of the aortic valve)
- don't make the zoom box too wide or too high: that will lower your frame rate
- adjust the width of the zoom box in the elevation plane on the right hand side of the monitor
- touch the 3D zoom button again to acquire a 3D image on the screen
- rotate the tracking ball to look at the mitral valve from the left atrium (rotate towards you) or from the left ventricle (rotate away from you)
- use the rotating knob below ‘rotate Z' on the touch screen to rotate the 3D image
- for the surgeon's view: use the tracking ball to get an en face view of the mitral valve from the LA side, use the rotate Z knob until the AV is in the 12 o'clock position and the LA
appendage appears on the left - adjust gain by rotating the 3D knob (overgain will obstruct the anatomy by brown speckle, undergain will create ‘holes' in the anatomy)
- hit ‘acquire' to save the 3D image